Radio Mic

We had taken the sail down, but it was far too windy to continue with that job, so we decided to tackle a little job inside the boat and that was our fixing our radio mic. The cable that we ordered had come in, so I was really happy. Mean while Prudence had applied some magic and we had acquired a new to us radio mic from one of our followers. As a solution this is perfect, but we decided that we would still fix the old radio mic because it would mean that we had a workable spare.

Fixing the radio microphone

  • Forceps - They were actually long tweezes bit in the end we used ordinary tweezes as we could not find our long pair when we did the job
  • Multi meter - Used for checking the connections and tapping the cable out
  • Soldering Iron
  • Solder - Ours is from Maplin, but it still works
  • Heat shrink - Various sizes, a long length to cover the main cable and some fine heat shrink for covering the individual wires
  • Solder sucker - Removes solder
  • Magnifying glass - Used to inspect the new solder connections for dry joints

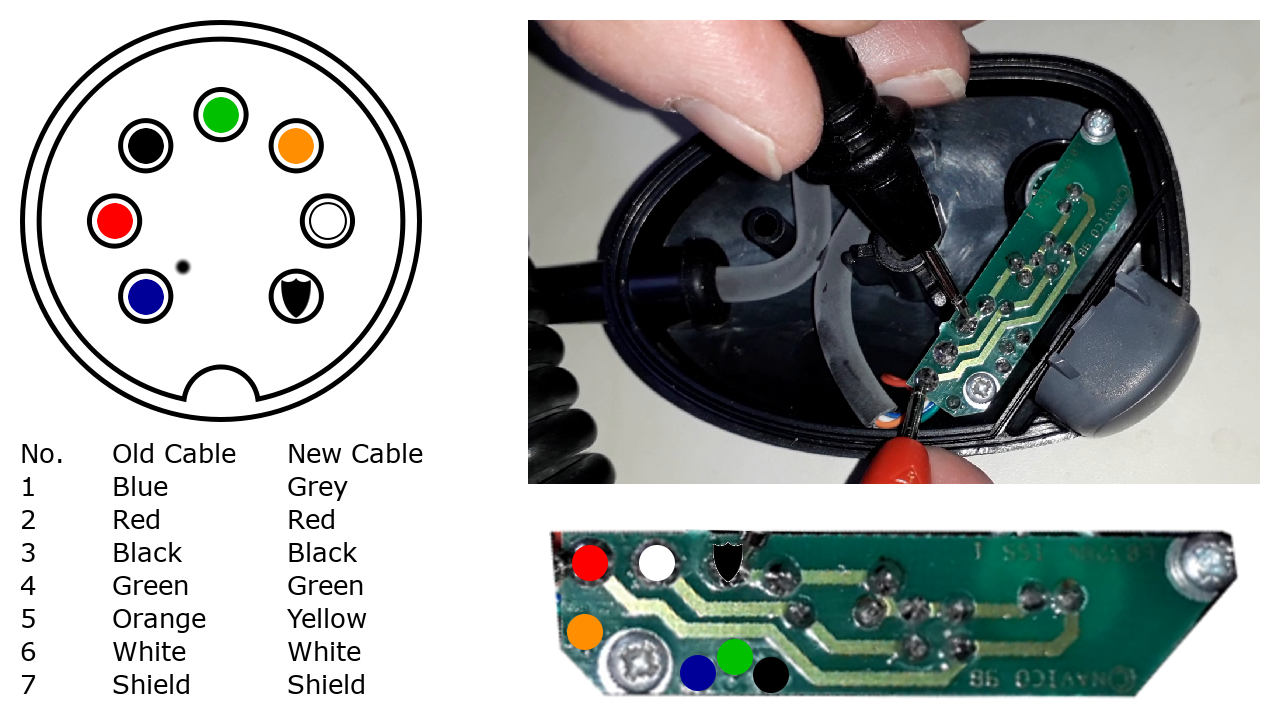
Initially I was short of a solder sucker and a long length of heat shrink, so I took the opportunity to review our tools. Once I had purchased a solder sucker and some more heat shrink, we used the Multi meter to work out which coloured wire went from the small circuit board to the connector, but before I did that I made sure that none of the wires were connected through the circuit board.
Wiring Diagram

Wiring Diagrams
No.     Old Cable     New Cable    

1
2
3
4
5
6
7

Blue
Red
Black
Green
Orange
White
Shield

Grey
Red
Black
Green
Yellow
White
Shield
Brown

Of course, our new cable had completely different colours for the wires, so we kept the Red, Black, Green, White and Shield the same, while we used Grey instead of Blue and Yellow instead of Orange. There was also a brown in the new cable that was not used. We connected all of the new wires to the circuit board, but we only connected the three wires that were used (Red, White and Brown) within the cable. Once we had decided what we were doing, it was just a case of getting on with the job

  • De-soldering gun - Use the de-soldering gun to remove solder from the circuit board so that you can remove the old wires
  • Tin the wires - Tin the wires before you put the new wires into the circuit board. This keeps the wires together as well as increasing the connectivity of all the wires in the board
  • Heat shrink - Add the heat shrink before you connect the cables together
  • Microphone - Make sure that the wire goes through the microphone case before you solder the new wires on to the circuit board
  • Dry joints - Inspect each connection between the circuit board and the cable to make sure that you do not have a dry joint. If you do, remedy the situation by trying again
  • Testing - Make sure that you test, each individual wire as well as the whole unit

Top Tip - Soldered connections are never as strong as mechanical connections so protect soldered connections by removing any strain on the connections

Hand tools on our boat

  • Precision screwdrivers - Used for small screws
  • Socket set - Filled with various sockets and screw driver tips
  • Allen keys - Used for a variety of nuts with an Allen key head
  • Ring spanners - Various sizes, metric and imperial. We needed a short ring spanner, so we cut one in half so that it could do the job required
  • Ratchet spanners - Not as much use as we thought because they have a big head, but when you have the space around the nut then they really do help
  • Vice grips - Really handy and a must have on our boat
  • Adjustable spanner - Sometime you do not have the right socket, so an adjustable socket in the thing you need in these circumstances
  • Wobbly bits - These are universal joints and they also have other joints so that you can go from one size of socket to another
  • Screwdrivers - You will need short screw drivers as well as long ones
  • Combined cable stripper and crimper - Really handy to have on board, we use it a lot when we are doing electrical work
  • Wire cutters - Make sure you have a flat back so you can use them to also cut cable ties
  • Pliers - Variety of pliers, large and small

Along with the solder sucker that I needed for fixing the mike I decided to buy some more tools for Salty Lass, so I bought:-

  • Heat shrink - I got the larger size, but next time I go shopping I get some smaller heat shrink
  • Cable Ties - Small, for smaller jobs
  • Solder sucker - Needed for my electrical bag
  • Wet stone - Needed to sharpen my knives
  • Jewellers Screw drivers - My old ones were completely knackered
  • Good quality small screw drivers
  • Small files - For sharpening knives with a serrated edge

Top tip - If you are sharpening knives, make sure the point is blunt

Raising money for the RNLI

The RNLI turned 200 years old on 4th March 2024. So as sailors and people who promote the joy of sailing, we thought that we would like to raise just £200. What we hope is that other people take up the shout and raise their own £200. In the last 200 years the RNLI have saved over 144,000 lives and yet they are funded entirely by people like you. They are not government funded.

DONATE NOW
Buy us a Coffee
Buy us a coffee
Affiliate Links
Follow Us
Instagram - SY Salty Lass
Facebook - Salty Lass
Prudence and Friends Facebook page
You Tube - Sailing Yacht Salty Lass